Install & Validate: Apps & Plugins Licensing
(Required for all products)
Use this guide first before any individual plugin instructions. It takes you from download to validation so your purchased plugin(s) unlock correctly.
Before you start
- WordPress Role: Administrator
- WordPress version: 6.x recommended
- Access you’ll need:
- Your WordPress admin area
- Your purchased license key (find it in your purchase email or in My Account on apps-and-plugins.co.uk)
Important: Until a plugin is validated, its menus, widgets and front-end integrations are hidden/gated.
1) Download the Licensing Plugin
Download the Apps & Plugins Licensing Plugin (one-time install; it supports all our plugins).
Download the Licensing Plugin
2) Install the Licensing Plugin
Method A — via WordPress admin (recommended)
- In WordPress go to Plugins → Add New → Upload Plugin.
- Choose File and select the .zip you just downloaded.
- Click Install Now, then Activate.
Method B — via (S)FTP
- Unzip the download locally.
- Upload the plugin folder to /wp-content/plugins/.
- In WordPress go to Plugins and click Activate for the licensing plugin.
After activation you’ll find a new page at Settings → Apps & Plugins Licenses.
This page will look empty until you install/activate one of our plugins.
3) Upload and Activate your Purchased Plugin(s)
Install your purchased plugin(s) in the usual way (Plugins → Add New → Upload Plugin → Install Now → Activate).
When an Apps & Plugins product is activated, a matching licensing panel will appear dynamically on Settings → Apps & Plugins Licenses.
4) Open the Licenses Page and Validate
- Go to Settings → Apps & Plugins Licenses.
- Find the panel for your activated plugin.
- Paste your license key into the field for that plugin.
- Copy it exactly as shown (watch case; no extra spaces/characters).
- You’ll find the key in your purchase email or in My Account on apps-and-plugins.co.uk.
- Click Save & Validate.
- Wait a moment while your website securely checks and registers the key.
Success: You’ll see a Valid tick next to the key. The plugin unlocks immediately, and any admin menu items/widgets become available.
If you don’t see the menu straight away, refresh the page. If you use a cache plugin, clear/refresh caches.
In your apps-and-plugins.co.uk account, refresh your Licenses page and you’ll see the license now marked In Use.
5) Using More Than One Plugin?
- Keep the Licensing Plugin installed just once.
- Install/activate each additional Apps & Plugins product, then validate it in its own panel on Settings → Apps & Plugins Licenses.
- Each product validates independently.
Moving a License to Another Website
- Log in to apps-and-plugins.co.uk → My Account → Licenses and Deactivate the license for the current site.
- On the current site, go to Settings → Apps & Plugins Licenses, clear/remove the key for that plugin and click Save & Validate (it will now show as deactivated).
- On the new website, install the Licensing Plugin (if not already present), install/activate your product, then enter the same key and click Save & Validate.
Troubleshooting
- “Valid” shows but no menus/widgets appear
Refresh the admin page. If you use page/object caching, purge caches. Hard-refresh your browser (Shift+Reload). - “Invalid key” or “Could not validate”
Double-check you pasted the exact key (no spaces). Confirm you’re validating the right product. If the key is already in use elsewhere, deactivate it there first. - No licensing panel appears
Ensure the purchased plugin is installed and activated. The panel only appears for active Apps & Plugins products. - Firewall/security plugin blocking validation
Allow outbound requests from WordPress (WP_HTTP/cURL). Whitelist your site’s connection to our license server if your security plugin blocks external calls. - Still stuck?
Note any on-screen message and contact support with: your site URL, plugin name & version, WordPress version, and the exact issue observed.
Good to know
- You only need to install the Licensing Plugin once. Add as many Apps & Plugins products as you like; validate each in its panel.
- If you remove the Licensing Plugin, you will also remove access to license management/validation until it’s reinstalled.
That’s it—your plugin is now installed, validated and ready to use.
Welcome to Crumb Control!
This Crumb Control documentation helps you configure, and understand how the Crumb Control WordPress plugin works.
Settings
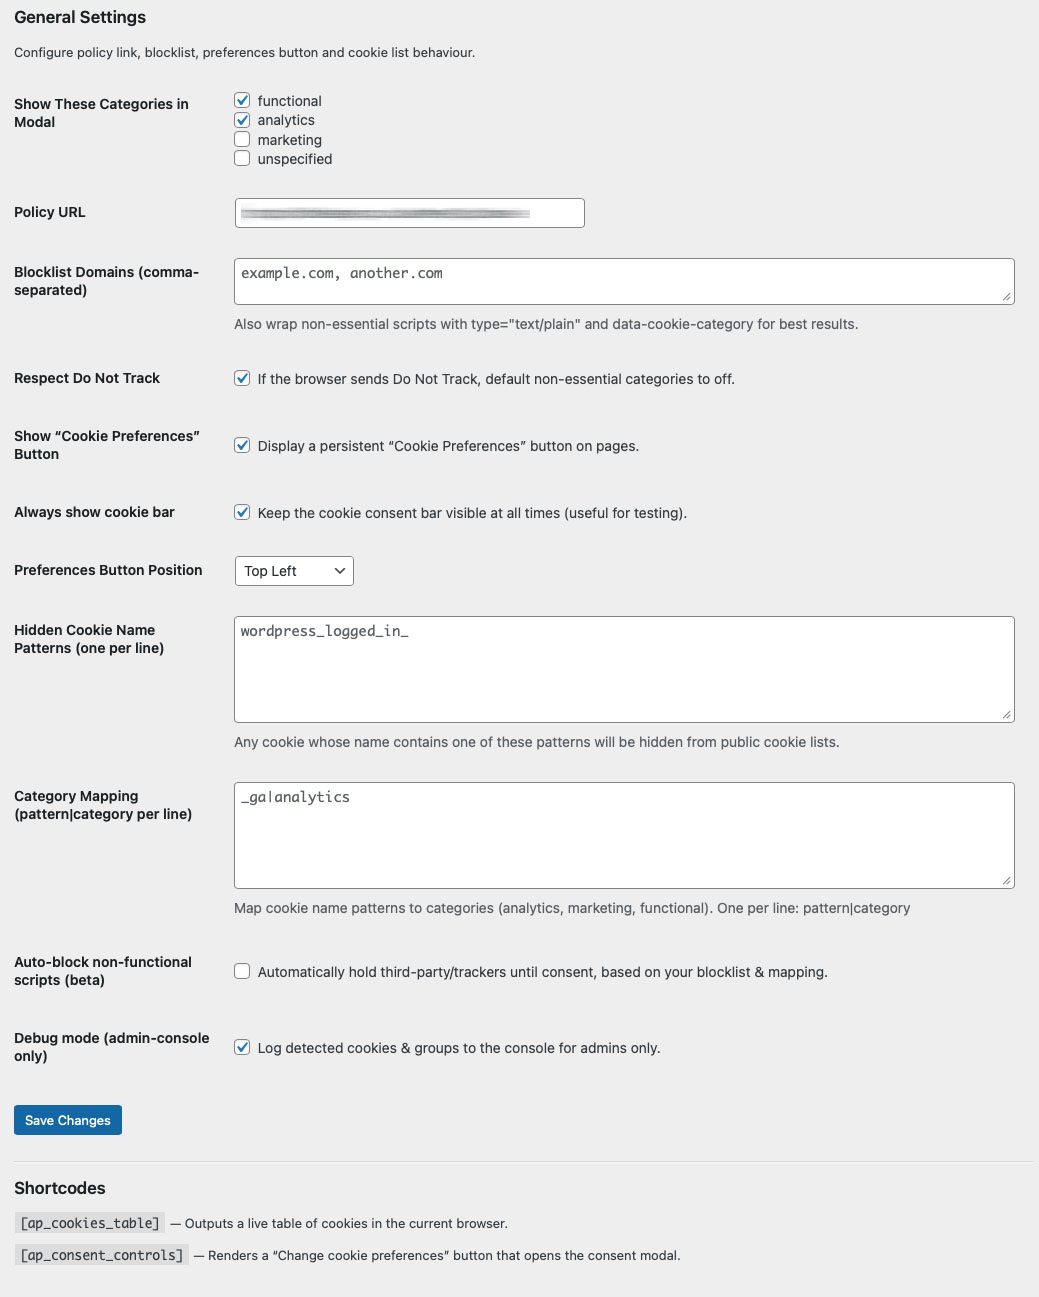
Let’s work through each of the settings:
1. Show These Categories in Modal
-
Purpose: Select which cookie categories should appear in the front-end consent modal.
-
Options: Functional, Analytics, Marketing, Unspecified
-
How it works: Only the categories you check here will be available for users to toggle. Unchecked categories remain hidden from the modal but can still be used for mapping and blocking behind the scenes.
2. Privacy Policy
-
Purpose: Set the URL of your Cookie or Privacy Policy page.
-
How it works: This link will appear in the consent bar and modal, ensuring users can easily access your cookie policy.
3. Blocklist Domains (comma-separated)
-
Purpose: Prevent scripts from loading from specific domains (e.g., trackers or marketing pixels).
-
Usage: Enter domain names (e.g., example.com, google-analytics.com) separated by commas.
-
Note: You should also ensure those scripts are wrapped in: “type=”text/plain” data-cookie-category=”your_category”” …to work effectively with the user’s preferences.
4. Respect Do Not Track
-
Purpose: Automatically disables non-essential categories if the user’s browser sends a “Do Not Track” signal.
-
How it works: When enabled, the plugin will default all non-strict categories to OFF for users with DNT enabled.
5. Show “Cookie Preferences” Button
-
Purpose: Permanently show a toggle/button that allows users to reopen the cookie preferences modal at any time.
-
How it works: A small button will appear (based on position set below), typically floating on screen or fixed in the footer.
6. Always show cookie bar
-
Purpose: Forces the cookie bar to always display, even after a decision has been made.
-
Usage: Primarily useful for testing or demos—should be disabled on live sites unless always-on visibility is required.
7. Preferences Button Position
-
Purpose: Choose the location of the persistent preferences toggle.
-
Options: Top Left, Top Right, Bottom Left, Bottom Right
-
How it works: Applies to the floating FAB or preferences button if the option above is enabled.
8. Hidden Cookie Name Patterns (one per line)
-
Purpose: Exclude certain cookies from appearing in the public-facing cookie list.
-
Usage: Enter unique identifiers (e.g., wordpress_logged_in_, _ga, wp-settings)—any cookie containing that string will be hidden.
-
Note: This doesn’t block or delete the cookie; it simply prevents it from appearing in the modal or frontend report – for easier control use the Cookie Manager to hide unwanted cookies such as admin only cookies.
9. Category Mapping (pattern/category per line)
-
Purpose: Automatically assign detected cookies to a specific category based on part of their name.
-
Usage: Enter one pattern per line, in the format: pattern|category Examples: _ga|analytics, _fbp|marketing
-
How it works: If a cookie name contains the defined pattern (e.g. _ga), it will be grouped under the specified category (analytics) in the consent modal.
-
Allowed categories: functional, analytics, marketing
10. Auto-block non-functional scripts (beta)
-
Purpose: Automatically delay loading of third-party scripts until appropriate consent is given.
-
How it works: When enabled, Crumb Control will attempt to block any script from the blocklist domains or matching your category mapping, unless the user has opted in.
-
NOTE: This is a beta feature and may not work reliably for all script types or configurations. For consistent results, it’s recommended to manually wrap scripts with conditional checks.
11. Debug Mode (admin-console only)
-
Purpose: Enable developer logging of detected cookies and their mapped categories.
-
How it works: When enabled, cookie detection details are printed to the browser’s developer console — visible only to logged-in admins.
-
Useful for: Verifying which cookies are being detected, Confirming category assignments, Debugging auto-blocking behaviour.
12. Shortcodes
-
Crumb Control includes two useful shortcodes:
-
: Outputs a live table of cookies detected in the current user’s browser session. Useful for diagnostics or transparency reporting.
-
: Renders a “Change cookie preferences” button that opens the modal for users to adjust their settings at any time. Can be placed in footers, widgets, or custom content areas.
Cookie Manager
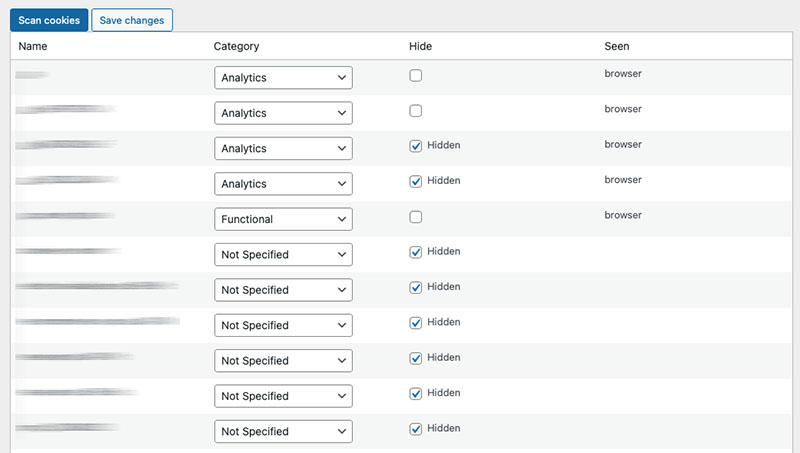
The Cookie Manager allows you to review, categorise, and optionally hide any cookies detected during a user session. This gives you full control over what cookies are displayed to users and how they are grouped by consent category.
Overview of Columns
|
Name |
The exact cookie name detected in the visitor’s browser. |
|
Category |
Dropdown to assign the cookie to a category (e.g., Functional, Analytics, Marketing). |
|
Hide |
Checkbox to hide the cookie from public view (e.g., if it’s technical, internal, or irrelevant). |
|
Seen |
Indicates where the cookie was detected (usually browser). |
1. Scan Cookies
-
Click this button to trigger a scan of cookies currently set in the browser. This helps populate the table with live, site-specific data.
-
NOTE: Re-scan after installing new plugins or adding new tracking scripts.
2. Assigning Categories
- For each cookie, you can assign it to one of the following:
- Functional – Required for the website to function (e.g., login sessions).
- Analytics – Used for performance and usage tracking (e.g., Google Analytics).
- Marketing – Used for remarketing or ad tracking (e.g., Facebook Pixel).
- Not Specified – Default value; cookie will not appear in the consent modal unless categorised.
-
Tip: Use the Category Mapping field in General Settings to auto-assign recurring cookies.
3. Hiding Cookies
-
Tick the Hidden checkbox to exclude a cookie from appearing in the front-end cookie table or modal.
-
Typical use cases: wordpress_logged_in_ – used for admin sessions, not relevant to users, ap_consent_state – internal to the plugin itself, Developer cookies or A/B testing tools.
- NOTE: Hidden cookies are still active unless manually blocked—they’re just not shown to users.
4. Saving Changes
-
After making edits:
-
Click Save Changes to update category assignments and visibility.
-
These settings are stored and applied automatically for future users.
Best Practices
- Assign all known cookies to categories for clarity and compliance.
- Hide unnecessary technical cookies that may confuse end-users.
- Regularly rescan after installing new plugins, scripts, or embeds.
Optional Add-Ons
Extend the functionality of Crumb Control with two powerful, purpose-built add-ons:
Consent Log Add-On
Keep a secure, timestamped record of each visitor’s cookie preferences. This plugin adds a consent history log for audit compliance and allows CSV export from the WordPress dashboard. Full details for this add-on can be found on its product page.
Branding Add-On
Fully customise the look and feel of your cookie consent interface. Change colours, icons, layout, button styles, and positioning to match your website branding—no code required. Full details for this add-on can be found on its product page.


