Install & Validate: Apps & Plugins Licensing
(Required for all products)
Use this guide first before any individual plugin instructions. It takes you from download to validation so your purchased plugin(s) unlock correctly.
Before you start
- WordPress Role: Administrator
- WordPress version: 6.x recommended
- Access you’ll need:
- Your WordPress admin area
- Your purchased license key (find it in your purchase email or in My Account on apps-and-plugins.co.uk)
Important: Until a plugin is validated, its menus, widgets and front-end integrations are hidden/gated.
1) Download the Licensing Plugin
Download the Apps & Plugins Licensing Plugin (one-time install; it supports all our plugins).
Download the Licensing Plugin
2) Install the Licensing Plugin
Method A — via WordPress admin (recommended)
- In WordPress go to Plugins → Add New → Upload Plugin.
- Choose File and select the .zip you just downloaded.
- Click Install Now, then Activate.
Method B — via (S)FTP
- Unzip the download locally.
- Upload the plugin folder to /wp-content/plugins/.
- In WordPress go to Plugins and click Activate for the licensing plugin.
After activation you’ll find a new page at Settings → Apps & Plugins Licenses.
This page will look empty until you install/activate one of our plugins.
3) Upload and Activate your Purchased Plugin(s)
Install your purchased plugin(s) in the usual way (Plugins → Add New → Upload Plugin → Install Now → Activate).
When an Apps & Plugins product is activated, a matching licensing panel will appear dynamically on Settings → Apps & Plugins Licenses.
4) Open the Licenses Page and Validate
- Go to Settings → Apps & Plugins Licenses.
- Find the panel for your activated plugin.
- Paste your license key into the field for that plugin.
- Copy it exactly as shown (watch case; no extra spaces/characters).
- You’ll find the key in your purchase email or in My Account on apps-and-plugins.co.uk.
- Click Save & Validate.
- Wait a moment while your website securely checks and registers the key.
Success: You’ll see a Valid tick next to the key. The plugin unlocks immediately, and any admin menu items/widgets become available.
If you don’t see the menu straight away, refresh the page. If you use a cache plugin, clear/refresh caches.
In your apps-and-plugins.co.uk account, refresh your Licenses page and you’ll see the license now marked In Use.
5) Using More Than One Plugin?
- Keep the Licensing Plugin installed just once.
- Install/activate each additional Apps & Plugins product, then validate it in its own panel on Settings → Apps & Plugins Licenses.
- Each product validates independently.
Moving a License to Another Website
- Log in to apps-and-plugins.co.uk → My Account → Licenses and Deactivate the license for the current site.
- On the current site, go to Settings → Apps & Plugins Licenses, clear/remove the key for that plugin and click Save & Validate (it will now show as deactivated).
- On the new website, install the Licensing Plugin (if not already present), install/activate your product, then enter the same key and click Save & Validate.
Troubleshooting
- “Valid” shows but no menus/widgets appear
Refresh the admin page. If you use page/object caching, purge caches. Hard-refresh your browser (Shift+Reload). - “Invalid key” or “Could not validate”
Double-check you pasted the exact key (no spaces). Confirm you’re validating the right product. If the key is already in use elsewhere, deactivate it there first. - No licensing panel appears
Ensure the purchased plugin is installed and activated. The panel only appears for active Apps & Plugins products. - Firewall/security plugin blocking validation
Allow outbound requests from WordPress (WP_HTTP/cURL). Whitelist your site’s connection to our license server if your security plugin blocks external calls. - Still stuck?
Note any on-screen message and contact support with: your site URL, plugin name & version, WordPress version, and the exact issue observed.
Good to know
- You only need to install the Licensing Plugin once. Add as many Apps & Plugins products as you like; validate each in its panel.
- If you remove the Licensing Plugin, you will also remove access to license management/validation until it’s reinstalled.
That’s it—your plugin is now installed, validated and ready to use.
Welcome to HackBlocker!
This documentation helps configure, and understand how HackBlocker protects your WordPress site.
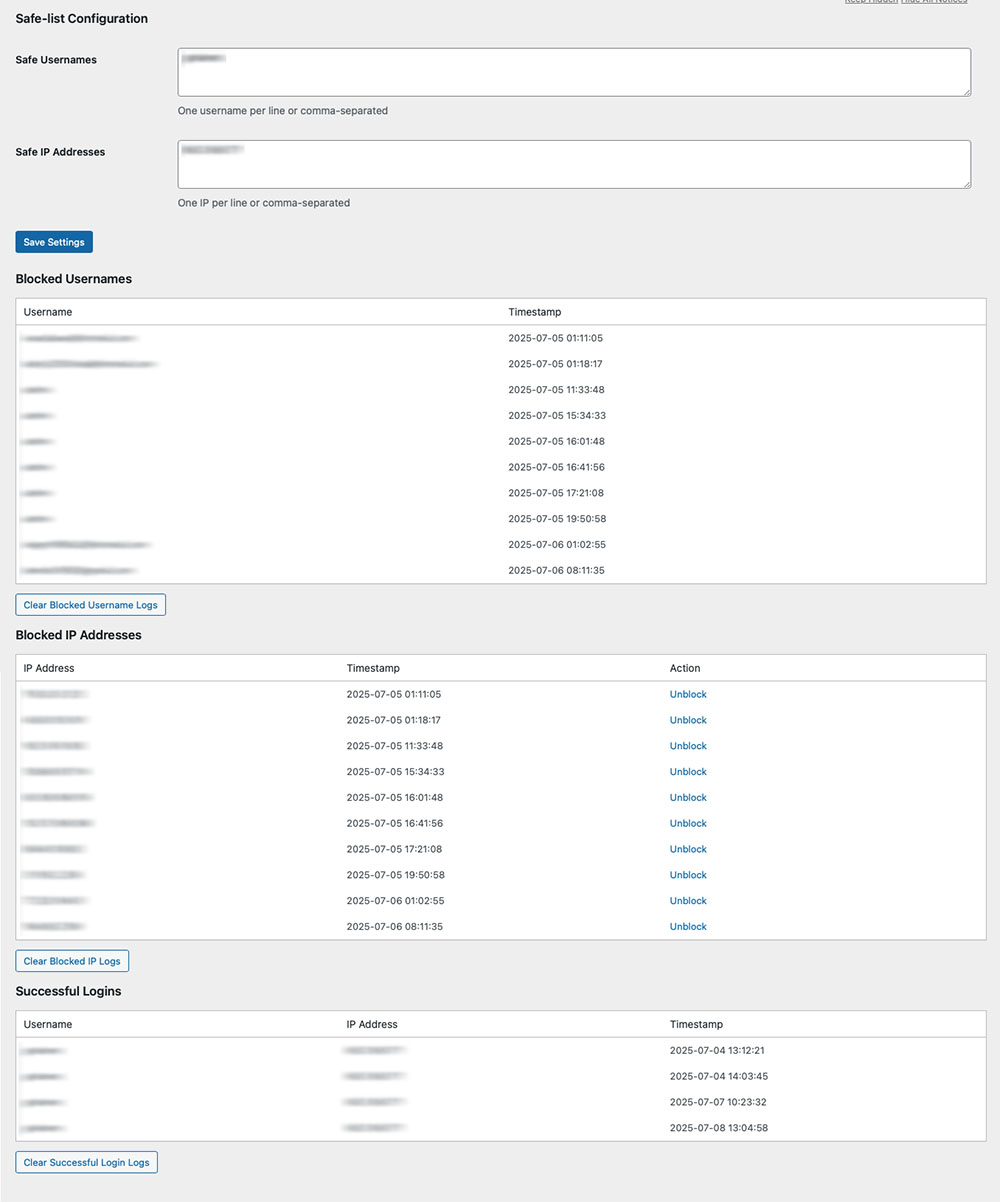
1. Quick Setup (Safe-List Configuration)
HackBlocker works out-of-the-box with default settings, but you’ll want to safe-list your admin username(s) and IP address(es) to avoid lockouts.
Navigate to Settings
- Go to HackBlocker in your admin sidebar.
Safe Usernames
- In the Safe-list Configuration section, enter your admin and trusted usernames.
- You can enter one username per line or comma-separated.
Safe IP Addresses
- Below the usernames field, enter IP addresses that should bypass blocking.
- Useful for your office IP, VPN IPs, or any static addresses you trust.
Save Settings
- Click Save Settings to apply your safe-lists.
2. How HackBlocker Works
HackBlocker integrates directly with WordPress’s authentication hooks to monitor and control login behavior.
IP Blocking
-
- On each login attempt, HackBlocker checks if the IP is on your safe-list.
- If not, it compares against previously blocked IPs.
- Blocked IPs immediately get a 403 response on login.
Username Validation
- For login attempts with a username not in your database (and not on the safe-list), HackBlocker:
- Logs the attempted username and IP.
- Automatically blocks that IP address.
- Terminates the login with a generic “Invalid credentials” message.
Logging Successful Logins
- Every successful wp_login event is captured: username, IP address, and timestamp.
- Logs are stored for up to 100 entries to keep your database lean.
Admin Dashboard
- Under Settings → HackBlocker, view three tables:
- Blocked Usernames
- Blocked IP Addresses
- Successful Logins
- Each table shows the relevant data and offers controls to clear logs or unblock specific IPs.
3. Managing Logs & Unblocking
- Clear Logs: Use the Clear buttons under each section to purge all entries.
- Unblock IP: Click Unblock next to any IP in the Blocked IP Addresses table to remove it from the ban list.
4. Tips & Best Practices
- Regularly Review Logs: Check both blocked attempts and successful logins to detect unusual patterns.
- Update Safe-Lists: If you change networks or add new admins, update your safe-lists promptly.
- Combine with CAPTCHA: For high-risk sites, consider adding a CAPTCHA plugin alongside HackBlocker.

