Welcome to HackBlocker! This documentation helps you install, configure, and understand how HackBlocker protects your WordPress site.
1. Installation & Activation
Download the Plugin
- Download the latest HackBlocker ZIP file from your account or repository.
Upload to WordPress
- Log into your WordPress admin dashboard.
- Navigate to Plugins → Add New → Upload Plugin.
- Click Choose File, select hackblocker.zip, and click Install Now.
Activate HackBlocker
- After installation completes, click Activate Plugin.
- You should see HackBlocker appear in the admin menu sidebar.
Verify Activation
- Go to Settings → HackBlocker.
- If you see the HackBlocker Settings & Logs page, the plugin is active and ready.
2. Quick Setup (Safe-List Configuration)
HackBlocker works out-of-the-box with default settings, but you’ll want to safe-list your admin username(s) and IP address(es) to avoid lockouts.
Navigate to Settings
- Go to Settings → HackBlocker in your admin sidebar.
Safe Usernames
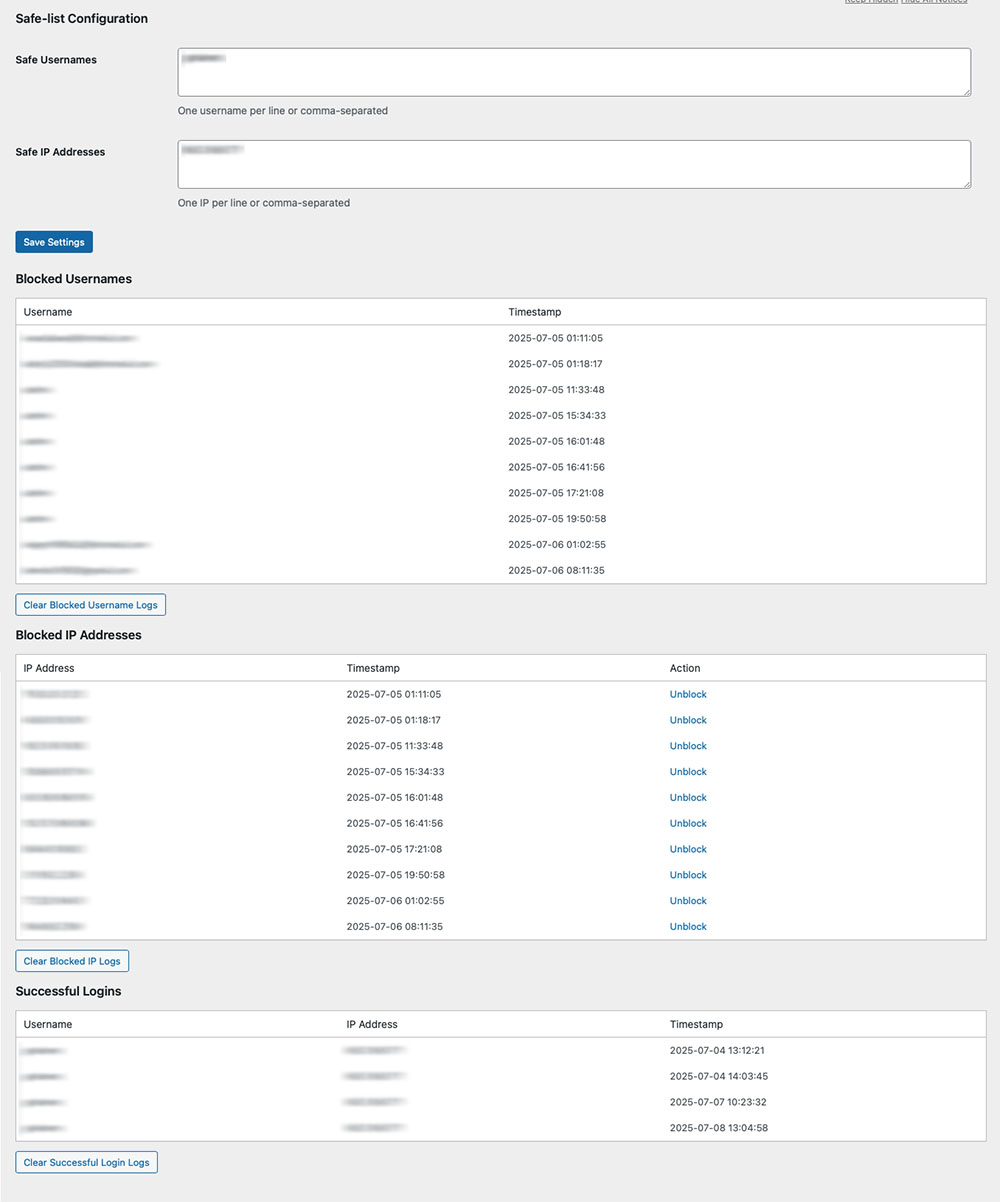
- In the Safe-list Configuration section, enter your admin and trusted usernames.
- You can enter one username per line or comma-separated.
Safe IP Addresses
- Below the usernames field, enter IP addresses that should bypass blocking.
- Useful for your office IP, VPN IPs, or any static addresses you trust.
Save Settings
- Click Save Settings to apply your safe-lists.
3. How HackBlocker Works
HackBlocker integrates directly with WordPress’s authentication hooks to monitor and control login behavior.
IP Blocking
-
- On each login attempt, HackBlocker checks if the IP is on your safe-list.
- If not, it compares against previously blocked IPs.
- Blocked IPs immediately get a 403 response on login.
Username Validation
- For login attempts with a username not in your database (and not on the safe-list), HackBlocker:
- Logs the attempted username and IP.
- Automatically blocks that IP address.
- Terminates the login with a generic “Invalid credentials” message.
Logging Successful Logins
- Every successful wp_login event is captured: username, IP address, and timestamp.
- Logs are stored for up to 100 entries to keep your database lean.
Admin Dashboard
- Under Settings → HackBlocker, view three tables:
- Blocked Usernames
- Blocked IP Addresses
- Successful Logins
- Each table shows the relevant data and offers controls to clear logs or unblock specific IPs.
4. Managing Logs & Unblocking
- Clear Logs: Use the Clear buttons under each section to purge all entries.
- Unblock IP: Click Unblock next to any IP in the Blocked IP Addresses table to remove it from the ban list.
5. Tips & Best Practices
- Regularly Review Logs: Check both blocked attempts and successful logins to detect unusual patterns.
- Update Safe-Lists: If you change networks or add new admins, update your safe-lists promptly.
- Combine with CAPTCHA: For high-risk sites, consider adding a CAPTCHA plugin alongside HackBlocker.

